Getting Started with Octopress on Github
Octopress! It’s what you’re reading this on right now. Octopress is a blog framework built on something called Jekyll. Let’s get started with Octopress on github.
It’s super easy, trust me.
Setting up Github
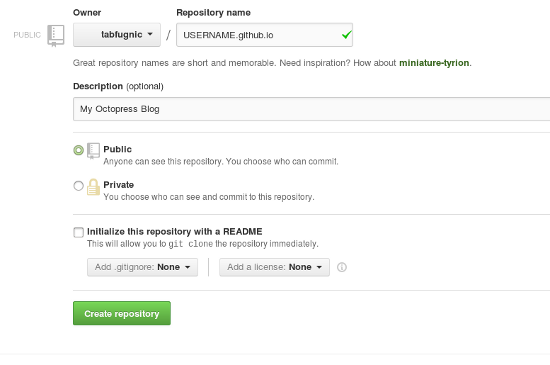
Log into Github Create a new repository using the bottom in the top right

Give the new repository the name USERNAME.github.io where USERNAME is your github username

Octopress
Now lets go back to our terminal.
- We’re going to open terminal
- Change into our development directory
- clone the repository
- change into that directory
cd ~/ga
git clone git://github.com/imathis/octopress.git octopress
cd octopress
Success! Now we need to get octopress up and running, this part is ruby and will become more familiar as the class goes on. We’re going to:
- Get the gem bundler, more on this later
- install all the dependencies
- finally we’ll install the default theme
- And deploy it!
gem install bundler
bundle install
rake install
All right the next step here is to get onto github so everyone can start looking at it. We’re going to:
- Set it up for github, this will guide you through the process
- Then deploy it
rake setup_github_pagesThis command will guide you through the process. When it asks for the url of your repo use the format git@github.com:USERNAME/USERNAME.github.io.git where USERNAME is your github user name.
We are almost done. We need to push up our changes.
rake gen_deployMake sure to push all of your changes after the fact, we’re pushing the source branch because that’s the hidden area where all of our blog information is stored and later generated by the rake gen_deploy
git add .
git commit -m "My blog is ready"
git push origin source
Finally check out
And write your first blog post